

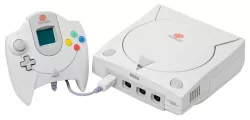
Sega Dreamcast (Best Retro Game Emulator)
The Sega Dreamcast is capable of playing “back-up” copies of games from a normal CD Disk using the Utopia Boot Disk available at The ISO Zone. You can download iso files for Dreamcast games and burn your own disks. The Dreamcast can also emulate other game systems so you can play those games too.
Related Dreamcast Pages
- Dreamcast Tips For Fans
- Recommended Emulators That Run On Dreamcast
- Dreamcast Specifications
- Dreamcast Game Console Manual
How to extend the life of your PlayStation, Microsoft XBOX, Nintendo, Sega, Atari Jaguar and other CD / DVD based video games and Consoles.
You would be surprised at how many CD and DVD based game systems go bad, simply because the laser lens was never cleaned. Junk, goo, gunk and dust accumulate on the Laser Lens over time. In fact, it is recommended that you clean your game systems laser lens ever 10 hours.
So how do you extend the life of your game systems CD, DVD, or Blueray? A simple investment of a an appropriate lens cleaner and faithful use every 10 or so hours of game play. Think about it, I bet you have never cleaned your video game systems laser lens and you have already had it for at least a year.
Opening Your Game Console.
There may come a time when your game consoles fan slows down (Modern Game Consoles), or the vents get clogged (All Game Consoles), or you need to do something else inside of your game console that is no longer under warranty. This is a short-list of tools that are required that I will post as I have the relevant information.
Nintendo 64
To open the N64 game console you will need a 4.5 mm security screwdriver. One of the easiest ways to get one is on eBay or Amazon – but don’t be cheap – spend the money to buy a quality tool that will last. “Well made tools will last you a life time.” Its best to buy one made for the N64 because some security screwdrivers or the security bits\t that fit into a bit-screwdriver are often to wide to fit into the hole or may not provide the needed length for the bit to reach the the security bolt. Whatever you do, do not use the “Pen Trick” which introduces heat that weakens the screw hole and connecting case..
Related NES Pages
Sega Dreamcast
I open many Sega Dreamcast units to clean them before they are tested and listed for sale. The Dreamcast can be opened with an appropriately sized Phillips Screwdriver. First remove any game disks, cords, memory cards, etc. When opening the Dreamcast, place a towel onto the flat surface you will be working on and set the Dreamcast top – down onto the towel to remove the screws. All the screw holes are easy to see and there are no hidden screws. Once the screws have been completely loosened, carefully turn the Dreamcast top – up and slowly remove the .top by lifting up. Try not to pull up the Laser unit when doing this, it sits loose on top of several prongs and is not screwed down. When replacing the screws – turn the unit Top – Down and do not over tighten the screws or you will damage the screw slot and case.
PlayStation Original
The original PlayStation (usually gray colored) can be opened with a normal appropriately sized Phillips Screwdriver. First remove any game disks, cords, memory cards, etc. Next place a towel on the flat table surface you will be working on and set the original PlayStation, top – down onto the towel to remove the screws. All the screw holes are easy to see and there are no hidden screws. Once the screws have been completely loosened, carefully turn the original PlayStation, top – up and slowly remove the top by lifting up. Try not to pull up the Laser unit when doing this, it sits loose on top of several prongs and is not screwed down. One important note about the Original PlayStation is these units are over 20 years old and depending on the environment and conditions it has been used and stored will effect the stability of the overall plastic case. The plastic inside the top of the case for the screws can easily break during removal or replacement. Breakage is especially likely if your original PlayStation has had any extended time with an owner who smokes. Cigarette smoke breaks down the plastic over time. When replacing the screws – turn the unit Top – Down and make sure the holes and screws are correctly aligned. Do not over tighten the screws or you will damage the screw slot and case.
VIDEO TROUBLESHOOTING
Every video game console we sell on eBay is video recorded during the testing of the game system. The console itself, cables, controls, Accessories and any included games are each individually tested before being listed for sale and packed for shipping. In the rare event that the console is not properly working upon arrival, here are some typical troubleshooting steps to take retro video game consoles in general.
Cartridge Trouble Shooting
(Nintendo NES, Super Nintendo, Nintendo 64, Family Com, Sega Genesis, Sega Master System, Atari Jaguar, Colecovision, Intellivision, Odyssey, Neo Geo)
1) Turn on the game system FIRST, THEN turn on the TV.
2.)
Test the game console with different games. Cartridge based games are
over twenty years old and if they are not internally cleaned, will not
work or show video when inserted into the console.
(See how to clean N64 game carts video on YouTube at http://youtu.be/sGvT9Oa89Pk )
3.) Check and make sure the video input connections are snug and plugged correctly into the game console and into the TV or Video Monitor.
4.) If your plugging the game console into another device such as a DVD unit before it plugs into the TV or Monitor, try plugging the game console directly into the actual TV input ports. Also, make the DVD player or device is set to the correct pass-through setting for external devices. Usually, this is found on the DVD players remote control and says, Video/TV.
5.) Game consoles being plugged in with a coaxial type cable, usually require an analog channel set to 3 or 4 on the TV.
6.) Using your TV’s remote control or menu buttons, check to make sure the TV is set to the correct setting, which could be, DVD, Input 1, Input 2, Video In, or similar “Special” channel that tells the TV to use the RCA Composite inputs.
7.) Make sure the Composite Video Colors (Yellow, White, Red) are matched to the same colors on the TV input (Yellow, White, Red. Yellow = Video, White = Audio, Red = Audio.
8.) Some games require an N64 expansion pak. It fits under the top cover, is red, and replaces the jumper pak. Games Like Donkey Kong 64, etc.
9.) Try testing it on a different TV.
10.) Some specific High Definition TV’s are known to Not Work with specific game cartidges and/or game consoles.
11.) If the power light on the game console is lit, there could be a problem with the Video Cable itself, or possibly the game cartridge.
Related NES Pages
Retro Hand Held Game Consoles Trouble Shooting:
(Nintendo Gameboy and DS series, Sega Game Gear, Atari Lynx, Sony PSP and Vita, Neo Geo)
1) Replace old batteries with new batteries.
2.) Plug the game console into AC power using a manufacture approved adapter.
3.) Test the console with different games.
4.) Look for a power light on the console to make sure it is actually receiving power.
5.) Early retro game consoles (1980’s/90’s) came with a contrast/brightness/LCD Adjustment dial.
Locate the dial and rotate it to determine if the dial is correctly set. New hand held consoles have a menu setting on screen, however if you can see the menu on the LCD screen, you should also already be able to see a game. If you can’t see the game but can see the system menu, then it may be the game that is bad.
6.)
Test the game console with different games. Cartridge based games are
over twenty years old and if they are not internally cleaned, will not
work or show video when inserted into the console.
(See how to clean N64 game carts video on YouTube at http://youtu.be/sGvT9Oa89Pk )
7.) CD/DVD/Blueray type disc handheld game consoles. Using a cotton swab like Q-Tip, dampen one with rubbing alchol and lightly and gently clean the Laser Disc Lens.
KNOWN HAND HELD GAME CONSOLES WITH VIDEO AND AUDIO PROBLEMS
The early retro hand-held game consoles like the original GameBoy and Game Gear used capacitors which have a relatively short lifespan. Sega’s Game Gear is especially known to have video and audio problems due to capacitor failure. Capacitors tend to leak with age and once they leak, they fail. If you are comfortable with soldering and soldering irons, you can replace the capacitor yourself – you need to ensure that each capacitor is replaced with a new capacitor of the same kind and rating. There are YouTube videos by people such as LukeMorris1 (YouTube)
CD, DVD, BlueRay based Game Consoles Trouble Shooting:
(Xbox, Playstation, Sega CD/Saturn/Dreamcast, Nintendo Wii, Wii-U, GameCube, NeoGeo/Atari)
1) Turn on the game system FIRST, THEN turn on the TV.
2.) Check to make sure the game console is powered on.
3.) XBOX 360 and forward: Check the video cable switch on the actual cable and move it a few times to make sure it is on the proper setting for High Definition TV’s or Standard Definition TV’s.
4.) Look for flashing lights on the game console front pannel that may also be associated with a series of code beeps. Write down the color/beep sequence. Some game consoles use different colors. Once you have written down the sequence, search on a web search engine for the sequence and console model. For example, Three flashing red lights in a circle on the XBOX 360 is called the circle of death. PlayStation 3 has its own sequence of Yellow and Red Lights. There may be something wrong with your game console that requires servicing by the manufacture.
5.) Check and make sure the video input connections are snug and plugged correctly into the game console and into the TV or Video Monitor.
6.) If your plugging the game console into another device such as a DVD unit before it plugs into the TV or Moitor, try plugging the game console directly into the actual TV input ports. Also, make the DVD player or device is set to the correct pass-through setting for external devices. Usually, this is found on the DVD players remote control and says, Video/TV.
7.) Game consoles being plugged in with a coaxial type cable, usually require an analog channel set to 3 or 4 on the TV.
8.) Using your TV’s remote control or menu buttons, check to make sure the TV is set to the correct setting, which could be, DVD, Input 1, Input 2, Video In, or similar “Special” channel that tells the TV to use the RCA Composite inputs.
9.) Make sure the Composite Video Colors (Yellow, White, Red) are matched to the same colors on the TV input (Yellow, White, Red. Yellow = Video, White = Audio, Red = Audio.
10.) If your video cable is a Component Cable (Red, Blue, Green), make sure they are plugged into the Red, Blue, Green RCA input locations on your TV.
11.) Make sure any direct HD to HD cables are plugged in correctly.
12.) Try testing it on a different TV.
13.) Some specific High Definition TV’s are known to Not Work with specific game consoles. Do a web search on Yahoo, Google or similar for the model of your game console and the TV you own. In most cases, other have experienced the same issue and you might find specific helpful troubleshooting tips that worked for other gamers.
14.) If the power light on the game console is lit, there could be a problem with the actual Video Cable itself. If you have a friend who owns the same game console, ask to test their video cable on your game system. Also ask to test your game system and your video cable on their TV.
15.) For game consoles still on the open market and/or made by a company still in existence, check their website forums, troubleshooting tips, support page, etc. for information about resolving video issues.